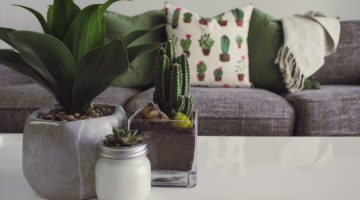
Starting a garden – especially as a beginner, can be quite the daunting task. Gardening comes with its fair share of responsibilities but having a good plan handy goes a long way in helping you create a garden you’ll love looking at as much as working in.
Before you start your garden, you might want to have satisfactory answers to these questions.
- What is this garden space for?
- How do I envision this garden?
- How much money and time can I devote to it?
When you have defined answers to these questions, you can start your own garden from scratch with this step by step plan.
Starting your garden from scratch
STEP 1: Picking the right spot for your garden
Chances are that you already have a spot set aside for your garden – but is it the right spot?
Most, if not all vegetables and flowers need about six hours of sunlight daily. So if you have already chosen a spot or you are contemplating one, it is important to watch your spot for a few days and monitor how sunlight moves across it. As much as you should choose a spot that receives a good amount of sunlight, too much sunlight in your garden can kill the plants.
On the other hand, if your chosen spot doesn’t receive as much sunlight as six hours daily, then you should consider planting flowers or vegetables that tolerate shade. The best way to find out “what to plant where” is to check plant tags to see how much sun different plants need.
Another important factor to consider is the wind. If your garden is in a windy area, consider having a windbreak such as strong trellises in place.
And finally, the position of your garden! Have your garden where you must see it. This makes it more difficult to ignore the responsibility that comes with gardening. A garden that is close to the mailbox or just outside the back door is more likely to be attended to than one that is hidden away.
Tip: Place your garden near a water spigot. This will make watering your garden much easier.
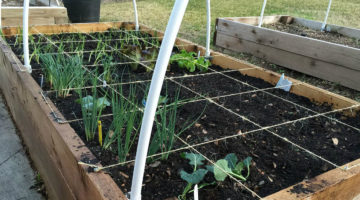
STEP 2: Remove unwanted vegetation from your chosen area
When you’ve chosen the right spot for your garden bed as described in Step 1, the next step to take is to remove any existing vegetation.
One method used to kill vegetation is layering. This involves smothering the vegetation by spreading newspapers. Gardeners use layering when they need to remove existing grass in a proposed garden space.
Another method that works just as well is solarization. Here, vegetation is killed when the soil is baked to a high temperature by the heat of the sun.
These methods highlighted above are most-effective for people who convert their lawn areas to a garden. But if you are reclaiming a land from the woods or have an overgrown pasture in your proposed garden space, it will take more drastic measures than solarization and layering to do the job. In that case, you should hire the professionals!
STEP 3: Improve the soil
If you really want your garden to flourish then you have to boost the soil with organic matter.
To boost the soil, add dry grass clippings, a 2- to 3-inch layer of compost, decayed leaves or old manure to it. You can choose to not dig or dig soil till the organic matter sits in the soil. If you choose not to dig the soil or you are working with an already established garden bed, you can leave all organic matter on the soil surface. Eventually, the organic matter penetrates the soil.
Benefits of and caution when digging the soil to introduce organic matter
Digging the soil allows plant roots to penetrate more easily. However, digging the soil when it is too dry or too wet can ruin its structure.
To know what time you should start digging, take some of the soil in your fist and make a small ball. If you can’t make a small ball without making the soil wet, then it is too dry. But if you can’t make a small ball because there’s too much water, then it’s too wet. The perfect time to dig the soil is when it is moist enough to be molded into a small loose ball but also dry enough that it falls apart when you drop it.
Use a spade to turn the top 8–12 inches of soil while gently mixing in the organic matter.
Tip: If you’re looking to start a home vegetable garden or in cases where your garden beds are for annual flowers, turn the soil just once every year before you plant. The best time of the year to turn the soil is in the spring.
STEP 4: Pick your plants
Here are some easy-to-grow plants for beginners. Because, depending on what you would like to have in your garden, whether annual, vegetables or perennials, one of these plants will be a good place to start.
Annual: Calendula, marigolds, cosmos, geraniums, impatiens, zinnias, and sunflowers.
Perennials: Russian sage, black-eyed Susans, daylilies pansies, purple coneflowers, lambs-ears, and phlox.
Vegetables: tomatoes, lettuce, peppers, and cucumbers.
STEP 5: Planting
When choosing what to plant at a certain time of the year, it is important to consider if the season favors your choice of a plant before heading out to buy the seedlings.
Some plants like kale and pansies tolerate cold, so they can be planted in late winter or autumn. On the other hand, tomatoes and many annual flowers, do not tolerate cold, so they thrive in mid-spring and mid-autumn.
Tip for seed preservation: Adhere to seed-packet instructions such as placing the containers under artificial lights for homes without a window space. For homes with a sunny windowsill, you can just place your containers there.
STEP 6: Watering
Water your seedlings every day so they don’t dry out. When they get larger, you can water once every two to three days. If you move a plant from one garden bed to another, it is important to water frequently until the roots become well-established in their new home.
Generally, the frequency of soil watering depends on the soil, climate humidity, and frequency of rainfall.
STEP 7: Mulching
Mulching keeps weeds out and lets water in.
There are so many mulch options you can use – whether it is pine needles or cocoa hulls or even bark chips, just be sure to mulch.
Tip: If you are starting a vegetable garden or bed for annuals, choose a mulch that will decompose in a few short months. On the other hand, if you are growing perennials, use longer-lasting mulch like the bark chips mentioned above.
STEP 8: Maintenance
Now that you have a garden ready, the next step is to water the garden when needed and take out the weeds before they choke your plants.
Tip: If you use dry fertilizer then fertilize once about halfway through the planting season. On the other hand, with liquid fertilizer, you have to fertilize every month or two.
Conclusion
Following these steps should result in a garden you’ll love looking at as much as working in. Keep in mind that gardening is good for your health, can reduce stress, fight depression and improve your diet. Plus if your harvest is not as bountiful this year, then there’s always next year.
Good luck.